

Build an Event-Driven Neural Style Transfer Application Using AWS Lambda


To build a production-ready ML application and ensure its stability in the long run, we need to take care of a long checklist of requirements which include the ease with which the models could be iterated, reproducibility, infrastructure, automation, resources, memory, and so on. On top of that, we need a seamless developer experience. How hard could it be?
Flyte can handle the former set of issues because:
- it’s a workflow automation platform that helps maintain and reproduce pipelines.
- it provides the control knobs for infrastructure, resources, and memory.
Also, Flyte simplifies the developer experience. In this blog post, we’ll see how by building a neural style transfer application using Flyte and AWS Lambda. We’ll code the end-to-end pipeline and assign the required compute to run the code. Further, we'll design an event-driven mechanism to trigger the pipeline and output a stylized image when a user uploads an image. From a user perspective, a stylized output image has to be generated upon uploading an image.
Since the application has to be triggered on an event, i.e., image upload, a more suitable choice for Flyte would be to use AWS Lambda. It is serverless and an event-driven compute service. Our neural style transfer application will leverage the “event-driven feature” of AWS Lambda.
Let’s look at how we could stitch the pipeline automation and event-driven service together using Flyte and AWS Lambda.
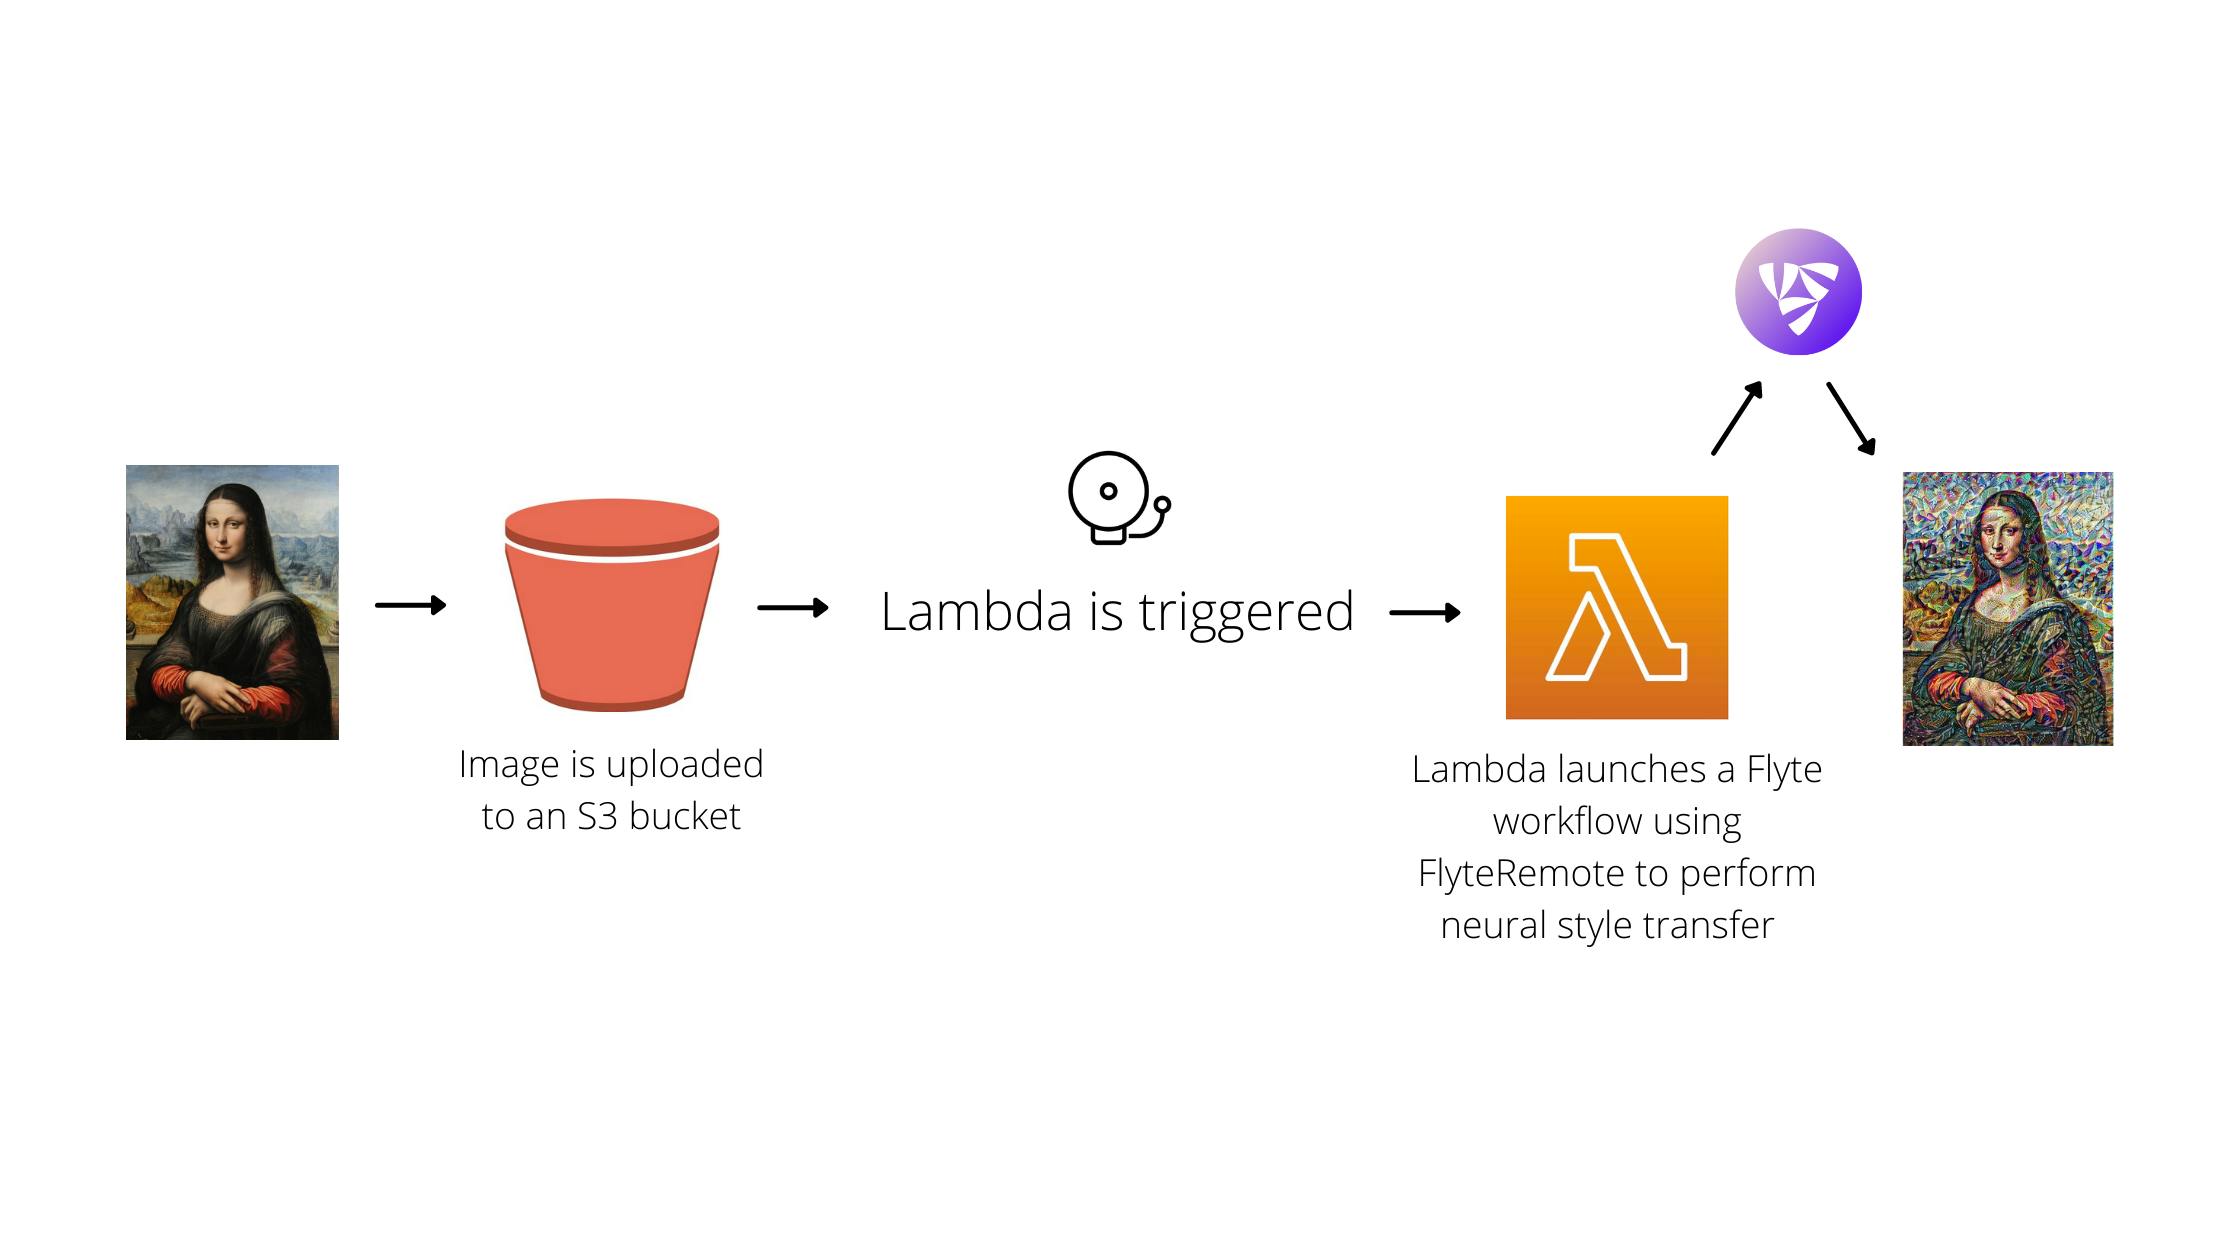 Figure 1. An overview of the application
Application Code
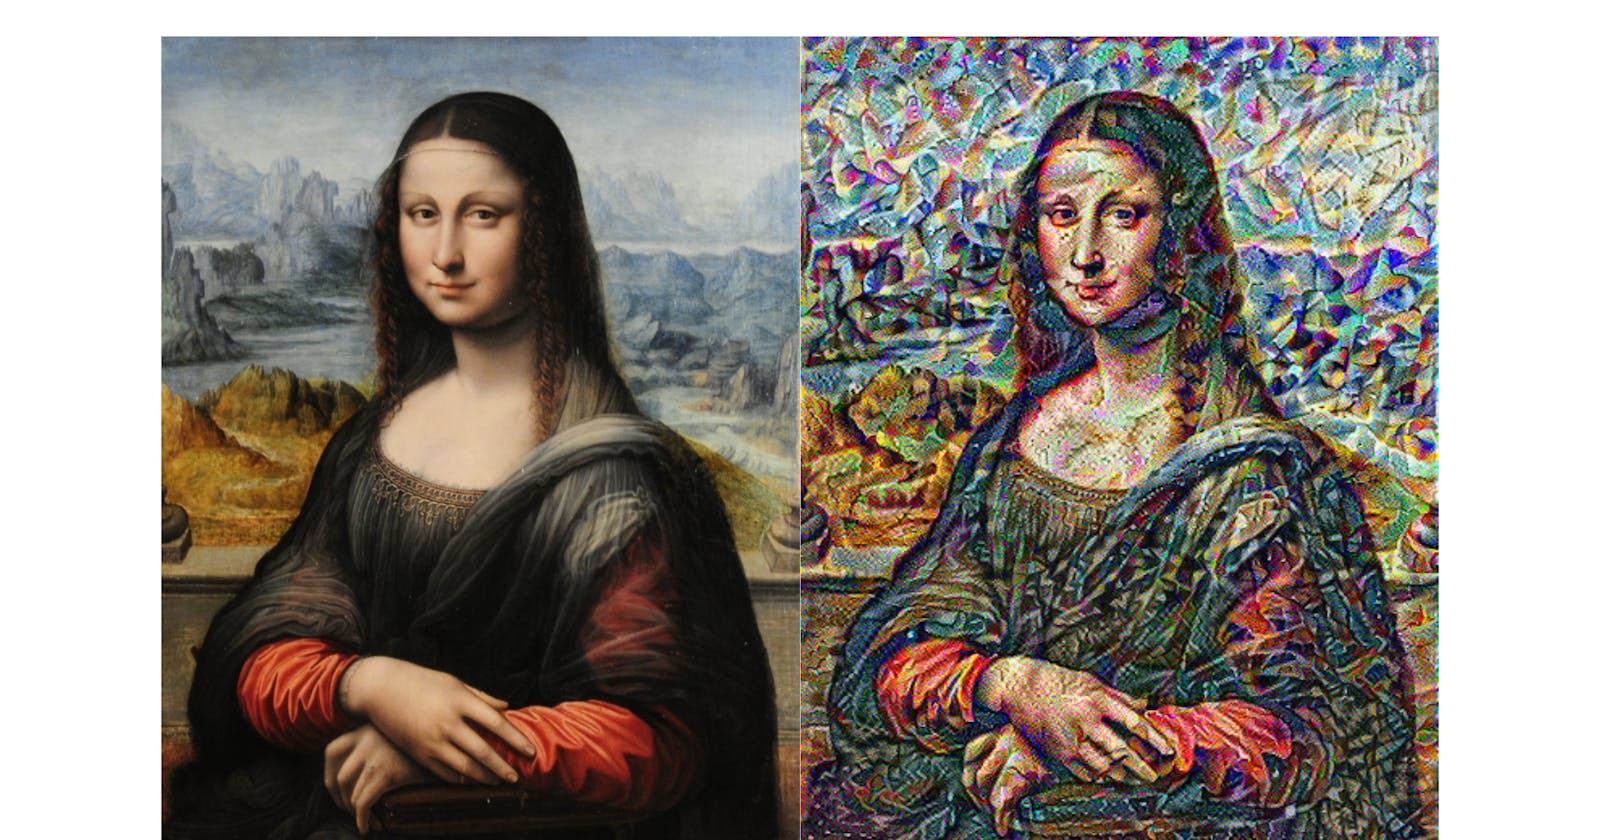
Neural style transfer is applying the style of the style image onto the content image. The output image would be a blend of the content and style images.
To get started with the code, first import and configure the dependencies.
Note: This code is an adaption of the Neural style transfer example from the TensorFlow documentation. To run the code, ensure tensorflow, flytekit, and Pillow libraries are installed through pip.
import os
from typing import Tuple

import flytekit
import numpy as np
import PIL.Image
import tensorflow as tf
from flytekit import Resources, dynamic, task, workflow
from flytekit.types.file import FlyteFile

style_weight = 1e-2
content_weight = 1e4
total_variation_weight = 30

content_layers = ["block5_conv2"]
style_layers = [
   "block1_conv1",
   "block2_conv1",
   "block3_conv1",
   "block4_conv1",
   "block5_conv1",
]
IMAGE_URL = "https://storage.googleapis.com/download.tensorflow.org/example_images/YellowLabradorLooking_new.jpg"

request_resources = Resources(cpu="1", mem="500Mi", storage="500Mi")


@task(requests=request_resources)
def tensor_to_image(tensor: tf.Variable) -> FlyteFile:
    tensor = tensor * 255
    tensor = np.array(tensor, dtype=np.uint8)
    if np.ndim(tensor) > 3:
        assert tensor.shape[0] == 1
        tensor = tensor[0]
    working_dir = flytekit.current_context().working_directory
    image_path = os.path.join(working_dir, "neural_style_transferred_img.png")
    image = PIL.Image.fromarray(tensor)
    image.save(image_path)
    return image_path
content_layers and style_layers are the layers of the VGG19 model, which we’ll use to build our model, and the tensor_to_image task converts a tensor to an image.
The first step of the model building process is to fetch the image and preprocess it. Define a @task to load the image and limit its maximum dimension to 512 pixels.
def load_img(path_to_img):
    max_dim = 512
    img = tf.io.read_file(path_to_img)
    img = tf.image.decode_image(img, channels=3)
    img = tf.image.convert_image_dtype(img, tf.float32)

    shape = tf.cast(tf.shape(img)[:-1], tf.float32)
    long_dim = max(shape)
    scale = max_dim / long_dim

    new_shape = tf.cast(shape * scale, tf.int32)

    img = tf.image.resize(img, new_shape)
    img = img[tf.newaxis, :]
    return img


@task(requests=request_resources)
def preprocess_img(
   content_img: FlyteFile, style_img: FlyteFile
) -> Tuple[tf.Tensor, tf.Tensor]:
    content_path = content_img.download()
    style_path = style_img.download()

    content_image = load_img(content_path)
    style_image = load_img(style_path)

    return content_image, style_image
The preprocess_img task downloads the content and style image files, and resizes them using the load_img function.
With the data ready to be used by the model, define a VGG19 model that returns the style and content tensors.
def vgg_layers(layer_names):
    """Creates a vgg model that returns a list of intermediate output values."""
    # Load our model. Load pretrained VGG, trained on imagenet data
    vgg = tf.keras.applications.VGG19(include_top=False, weights="imagenet")
    vgg.trainable = False

    outputs = [vgg.get_layer(name).output for name in layer_names]

    model = tf.keras.Model([vgg.input], outputs)
    return model


def gram_matrix(input_tensor):
    result = tf.linalg.einsum("bijc,bijd->bcd", input_tensor, input_tensor)
    input_shape = tf.shape(input_tensor)
    num_locations = tf.cast(input_shape[1] * input_shape[2], tf.float32)
    return result / (num_locations)


class StyleContentModel(tf.keras.models.Model):
    def __init__(self, style_layers, content_layers):
        super(StyleContentModel, self).__init__()
        self.vgg = vgg_layers(style_layers + content_layers)
        self.style_layers = style_layers
        self.content_layers = content_layers
        self.num_style_layers = len(style_layers)
        self.vgg.trainable = False

    def call(self, inputs):
        "Expects float input in [0,1]"
        inputs = inputs * 255.0
        preprocessed_input = tf.keras.applications.vgg19.preprocess_input(inputs)
        outputs = self.vgg(preprocessed_input)
        style_outputs, content_outputs = (
            outputs[: self.num_style_layers],
            outputs[self.num_style_layers :],
        )

        style_outputs = [gram_matrix(style_output) for style_output in style_outputs]

        content_dict = {
            content_name: value
            for content_name, value in zip(self.content_layers, content_outputs)
        }

        style_dict = {
            style_name: value
            for style_name, value in zip(self.style_layers, style_outputs)
        }

        return {"content": content_dict, "style": style_dict}
The vgg_layers function returns a list of intermediate layer outputs on top of which the model is built (note that we’re using a pretrained VGG network), and the gram_matrix function literally describes the style of an image. When the model is called on an image, it returns the gram matrix of the style_layers and the content of the content_layers.
Next comes the implementation of the style transfer algorithm. Calculate the total loss (style + content) by considering the weighted combination of the two losses.
def style_content_loss(outputs, content_targets, style_targets):
    style_outputs = outputs["style"]
    content_outputs = outputs["content"]
    style_loss = tf.add_n(
        [
            tf.reduce_mean((style_outputs[name] - style_targets[name]) ** 2)
            for name in style_outputs.keys()
        ]
    )
    style_loss *= style_weight / len(style_layers)

    content_loss = tf.add_n(
        [
            tf.reduce_mean((content_outputs[name] - content_targets[name]) ** 2)
            for name in content_outputs.keys()
        ]
    )
    content_loss *= content_weight / len(content_layers)
    loss = style_loss + content_loss
    return loss
Call style_content_loss from within tf.GradientTape to update the image.
@task(requests=Resources(cpu="1", mem="5Gi", storage="5Gi", ephemeral_storage="5Gi"))
def train_step(
    image: tf.Variable, content_image: tf.Tensor, style_image: tf.Tensor
) -> tf.Variable:
    opt = tf.optimizers.Adam(learning_rate=0.02, beta_1=0.99, epsilon=1e-1)
    extractor = StyleContentModel(style_layers, content_layers)

    style_targets = extractor(style_image)["style"]
    content_targets = extractor(content_image)["content"]

    with tf.GradientTape() as tape:
        outputs = extractor(image)
        loss = style_content_loss(outputs, content_targets, style_targets)
        loss += total_variation_weight * tf.image.total_variation(image)

    grad = tape.gradient(loss, image)
    opt.apply_gradients([(grad, image)])
    image.assign(clip_0_1(image))

    return image
The train_step task initializes the style and content target values (tensors), computes the total variation loss, runs gradient descent, applies the processed gradients, and clips the pixel values of the image between 0 and 1. Define the clip_0_1 function as follows:
def clip_0_1(image):
    return tf.clip_by_value(image, clip_value_min=0.0, clip_value_max=1.0)
Create a @dynamic workflow to trigger the train_step task for a specified number of epochs and steps_per_epoch.
@dynamic(requests=Resources(cpu="1", mem="5Gi", storage="5Gi", ephemeral_storage="5Gi"))
def generate_image(
    content_image: tf.Tensor, style_image: tf.Tensor, epochs: int, steps_per_epoch: int
) -> FlyteFile:
    image = tf.Variable(content_image)

    step = 0
    for n in range(epochs):
        for m in range(steps_per_epoch):
            step += 1
            image = train_step(
                image=image, content_image=content_image, style_image=style_image
            )
            print(".", end="", flush=True)
        print("Train step: {}".format(step))

    return tensor_to_image(tensor=image)
tf.Variable stores the content image. When it is called from within tf.GradientTape, the image, a tf.Variable is watched and the operations are recorded for automatic differentiation.
Lastly, define a @workflow to encapsulate the tasks and generate a stylized image.
@workflow
def neural_style_transfer_wf(
    content_img: FlyteFile = IMAGE_URL,
    style_img: FlyteFile = "https://storage.googleapis.com/download.tensorflow.org/example_images/Vassily_Kandinsky%2C_1913_-_Composition_7.jpg",
    epochs: int = 5,
    steps_per_epoch: int = 100,
) -> FlyteFile:
    content_image, style_image = preprocess_img(
        content_img=content_img, style_img=style_img
    )
    return generate_image(
        content_image=content_image,
        style_image=style_image,
        epochs=epochs,
        steps_per_epoch=steps_per_epoch,
    )


if __name__ == "__main__":
    print(f"Running {__file__}...")
    print(f"Stylized image: {neural_style_transfer_wf()}")
Once the pipeline is deployed, the subsequent step would be to set up the S3 bucket and configure Lambda.
Configure AWS S3 Bucket and Lambda
Images will be uploaded to the S3 bucket, and Lambda will be used to trigger the Flyte workflow as soon as an image is uploaded.
S3 Bucket
To configure the S3 bucket,
- Open the Amazon S3 console.
- Choose Buckets.
- Choose Create bucket.
- Give the bucket a name, e.g., “neural-style-transfer”.
- Choose the appropriate AWS region (make sure Lambda is created in the same AWS region).
- Block or unblock public access (this tutorial assumes that public access is granted).
- Choose Create bucket.
Lambda
A Lambda function can be created from scratch, through a blueprint, a container image, or a serverless app repository. Blueprint can be chosen to fetch sample lambda code, in our case, an S3 blueprint. However, since we need to connect to FlyteRemote from within Lambda, we have to install the flytekit library. Library installation within Lambda is possible through the zip file or container image approach.
Zip file is the easiest approach to get flytekit into Lambda, but due to the size limitations it imposes on the zip file, a much more feasible way would be to use the container image approach.
Container Image
To create a container image on your machine:
- Create a project directory (e.g., lambda) to accommodate the lambda function.
Create 4 files in the directory:
lambda_function.py,Dockerfile,requirements.txt, andflyte.config.lambda ├── Dockerfile ├── flyte.config ├── lambda_function.py └── requirements.txtlambda_function.py: encapsulate the code to fetch the uploaded image, instantiate a FlyteRemote object, and trigger the Flyte workflow.import urllib.parse import boto3 from flytekit.configuration import Config from flytekit.remote import FlyteRemote print("Loading function") s3 = boto3.client("s3") def lambda_handler(event, context): # Get the object from the event and show its content type bucket = event["Records"][0]["s3"]["bucket"]["name"] key = urllib.parse.unquote_plus( event["Records"][0]["s3"]["object"]["key"], encoding="utf-8" ) try: response = s3.get_object(Bucket=bucket, Key=key) print("CONTENT TYPE: " + response["ContentType"]) print(response["ContentType"]) except Exception as e: print(e) print( "Error getting object {} from bucket {}. Make sure they exist and your bucket is in the same region as this function.".format( key, bucket ) ) raise e # Configuration for accessing the Flyte cluster backend remote = FlyteRemote( config=Config.for_endpoint( endpoint="flyte.example.net", config_file="flyte.config" ), default_project="flytesnacks", default_domain="development", ) lp = remote.fetch_launch_plan( name="neural_style_transfer.example.neural_style_transfer_wf" ) remote.execute( lp, inputs={ "content_img": f"s3://{bucket}/{key}", "epochs": 5, "steps_per_epoch": 100, }, )ℹ️ FlyteRemote provides a programmatic interface to interact with the Flyte backend.
Make sure to fill in the
endpoint,default_project(e.g.flytesnacks),default_domain(e.g.development), and the name of the launch plan (e.g.neural_style_transfer.example.neural_style_transfer_wf).flyte.config: add configuration to connect to Flyte through FlyteRemote.
 [credentials]
 client_id=<client-id>
 auth_mode=basic
 authorization_metadata-key=<auth-metadata-key>
 oauth_scopes=all
Make sure to fill in or modify the configuration values. You can add “client secret” to the lambda’s environment variables, which will be explained in the Permissions section.
requirements.txt
flytekit>=1.0.0Dockerfile: copy
lambda_function.py,flyte.config, andrequirements.txtto the root. InstantiateCMDto the handler that is used in thelambda_function.pyfile.FROM amazon/aws-lambda-python:3.8 # Copy function code COPY lambda_function.py ${LAMBDA_TASK_ROOT} COPY flyte.config ${LAMBDA_TASK_ROOT} # Install the function's dependencies using file requirements.txt # from your project folder. COPY requirements.txt . RUN pip3 install -r requirements.txt --target "${LAMBDA_TASK_ROOT}" # Set the CMD to your handler (could also be done as a parameter override outside of the Dockerfile) CMD [ "lambda_function.lambda_handler" ]Build a Docker image in the project directory using the command:
docker build -t neural-style-transfer .Authenticate Docker CLI to the Amazon ECR registry.
aws ecr get-login-password --region <us-east-1> | docker login --username AWS --password-stdin <123456789012>.dkr.ecr.<us-east-1>.amazonaws.comMake sure to replace text in
<>.Create a repository in the ECR.
- Open the Amazon ECR console.
- Choose Repositories.
- Choose Create repository (e.g., lambda).
Tag your Docker image and push the image to the newly-created repository.
docker tag neural-style-transfer:latest <123456789012>.dkr.ecr.<us-east-1>.amazonaws.com/lambda:neural-style-transfer-latest

docker push <123456789012>.dkr.ecr.<us-east-1>.amazonaws.com/lambda:neural-style-transfer-latest
Make sure to replace text in
<>in the registry details.
That’s it! You now have your image in the ECR.
Lambda Configuration
To configure Lambda,
- Open the Functions page of the Lambda console.
- Choose Create function.
- Choose Container image.
- Enter the function name (e.g., s3-lambda).
- Give the Container Image URI (should be available in Amazon ECR console -> Repositories dashboard).
- Choose Create function.
You now have the lambda configured!
Permissions
S3 bucket and Lambda are currently separate entities. To trigger Lambda as soon as an image is uploaded to the S3 bucket, we must establish a connection between them.
Connecting them also requires setting up the required permissions. But before configuring the permissions, copy the bucket and Lambda ARNs.
Bucket ARN:
- Open the Amazon S3 console.
- Choose Buckets.
- Choose your bucket.
- Choose Properties.
- Copy the ARN.
Lambda ARN:
- Open the Functions page of the Lambda console.
- Choose Functions.
- Choose your Lambda.
- Choose Configuration and then choose Permissions.
- Click on the role in Execution role.
- Copy the ARN.
S3 Bucket
To set up permissions for the S3 bucket:
- Go to the S3 bucket you created.
- Select Permissions.
- In the Bucket policy, choose Edit.
- Add the following policy:
 {
     "Version": "2012-10-17",
     "Id": "ExamplePolicy",
     "Statement": [
         {
             "Sid": "ExampleStmt",
             "Effect": "Allow",
             "Principal": {
                 "AWS": "<lambda-execution-role-arn>"
             },
             "Action": "s3:GetObject",
             "Resource": "<s3-bucket-arn>/*"
         }
     ]
 }
Lambda
To set up permissions for the Lambda:
- Follow steps 1- 4 outlined in the Lambda ARN section.
- Under Permissions, choose Add Permissions.
- In the dropdown, choose Create inline policy.
- Under the JSON tab, paste the following:
{ "Version": "2012-10-17", "Statement": [ { "Sid": "ExampleStmt", "Action": [ "s3:GetObject" ], "Effect": "Allow", "Resource": [ "<s3-bucket-arn>" ] } ] } - Choose Review policy.
- For Name, enter a name for your policy.
- Choose Create policy.
You can add FLYTE_CREDENTIALS_CLIENT_SECRET to the lambda’s environment variables as part of initializing FlyteRemote. To do so:
- Follow steps 1-3 outlined in the Lambda ARN section.
- Choose Configuration and then choose Environment Variables.
- Set the key as
FLYTE_CREDENTIALS_CLIENT_SECRET, and the value should be your secret.
Now comes the fun part — linking lambda to the S3 bucket!
Trigger
To set up the trigger:
- Follow steps 1-3 outlined in the Lambda ARN section.
- Choose Configuration and then choose Triggers.
- Click Add trigger.
- In the Select a trigger dropdown, choose S3.
- Choose your S3 bucket under Bucket.
- Choose Add.
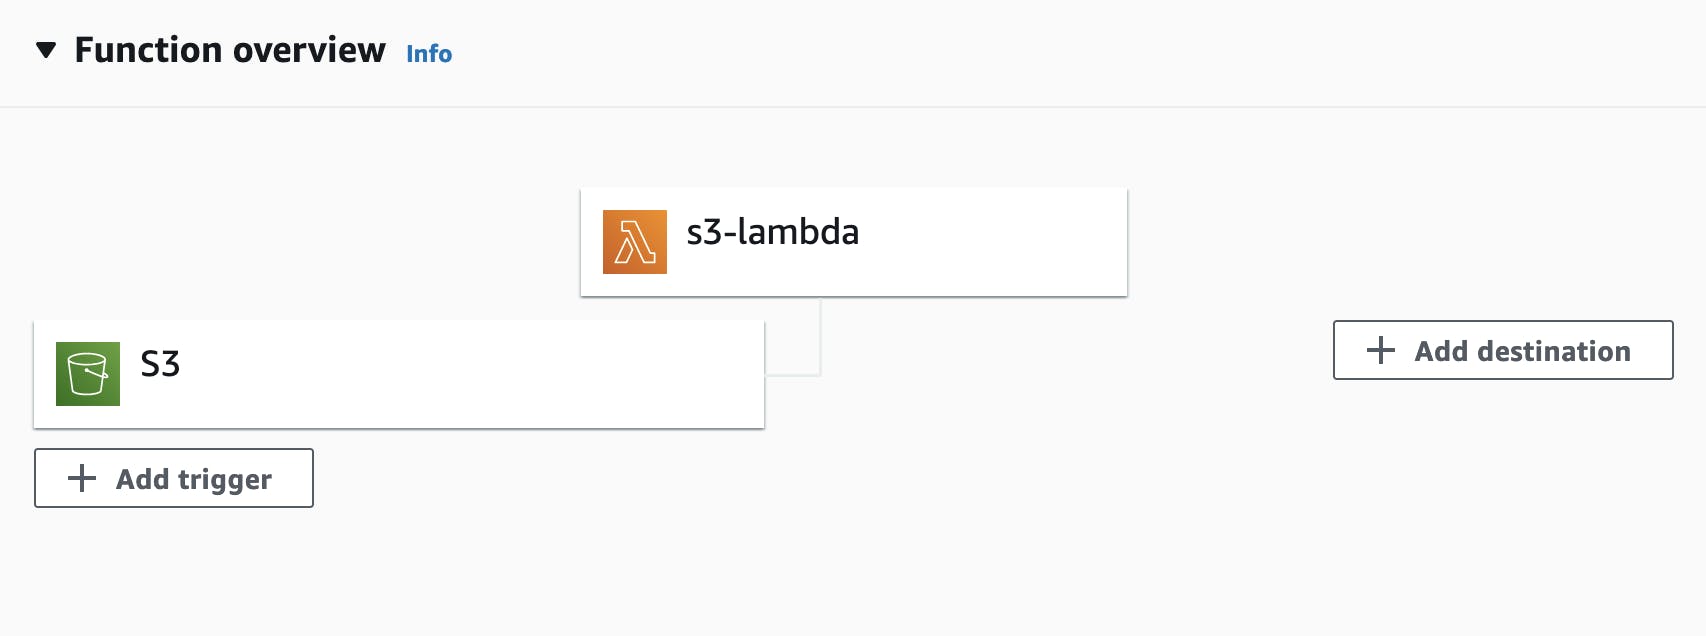 Figure 2. There should be a link established between S3 and Lambda.
Test the Application
To test the application, upload an image to the S3 bucket. On your Flyte console, under the neural style transfer workflow, check if the execution got triggered. The output of the execution should be your stylized image!
Next Steps
To summarize, we’ve built an event-driven application that triggers and executes an ML pipeline on the fly whenever there’s new data. It’s quite easy to productionize the pipeline with Flyte and AWS Lambda, as seen in this tutorial. We can also have a front-end application on top of this flow to make the application even more accessible.
If you want to give feedback about this tutorial or have questions regarding the implementation, please post in the comments below!