


How Flyte is Simplifying the Orchestration of Machine Learning Pipelines
Introducing a suite of new ML add-ons


An ML-powered product comprises several pieces composed into an iterative cycle — data collection, data cleaning, data labeling, model development, model evaluation, model deployment and model observability. Each stage in this process has its own set of requirements and automation possibilities. On a mission to simplify each step of the model development and deployment processes, we released a suite of ML features.
1.0 Flyte Decks
Available from Flyte 1.1.0
 Data plots provide deep insights into your data (Stable Diffusion)
Exploratory Data Analysis (EDA) is a mechanism to analyze data using visualization to better understand its intricacies. This significant phase of the data preparation process precedes building the ML models. Flyte Deck helps developers sketch the data visualizations within the Flyte UI.
pip install flytekitplugins-deck-standard
import flytekit
import matplotlib.pyplot as plt
import mpld3
import numpy as np
import pandas as pd
import plotly
import plotly.express as px
from flytekit import task, workflow
from flytekit.deck.renderer import TopFrameRenderer
from flytekitplugins.deck.renderer import BoxRenderer
from sklearn.decomposition import PCA
from typing_extensions import Annotated

df = px.data.tips()


@task
def box_plot() -> None:
    flytekit.Deck("box_plot", BoxRenderer("total_bill").to_html(df))


@task
def matplotlib_plot() -> None:
    xpoints = np.array([0, 6])
    ypoints = np.array([0, 250])

    fig = plt.figure()
    ax = fig.add_subplot(1, 1, 1)
    ax.plot(xpoints, ypoints)
    flytekit.Deck("matplotlib", mpld3.fig_to_html(fig))


@task
def dataframe_renderer() -> Annotated[
    pd.DataFrame,
    TopFrameRenderer(10)
]:
    return df


@task
def heatmap_plot() -> None:
    flytekit.Deck(
        "heatmap",
        plotly.io.to_html(
            px.density_heatmap(
                df,
                x="total_bill",
                y="tip",
                marginal_x="histogram",
                marginal_y="histogram",
            )
        ),
    )


@task
def pca_plot() -> None:
    iris_df = px.data.iris()
    X = iris_df[[
        "sepal_length",
        "sepal_width",
        "petal_length",
        "petal_width"
    ]]

    pca = PCA(n_components=3)
    components = pca.fit_transform(X)

    total_var = pca.explained_variance_ratio_.sum() * 100

    fig = px.scatter_3d(
        components,
        x=0,
        y=1,
        z=2,
        color=iris_df["species"],
        title=f"Total Explained Variance: {total_var:.2f}%",
        labels={"0": "PC 1", "1": "PC 2", "2": "PC 3"},
    )
    flytekit.Deck(
        "pca",
        plotly.io.to_html(fig),
    )


@workflow
def wf():
    box_plot()
    matplotlib_plot()
    dataframe_renderer()
    heatmap_plot()
    pca_plot()
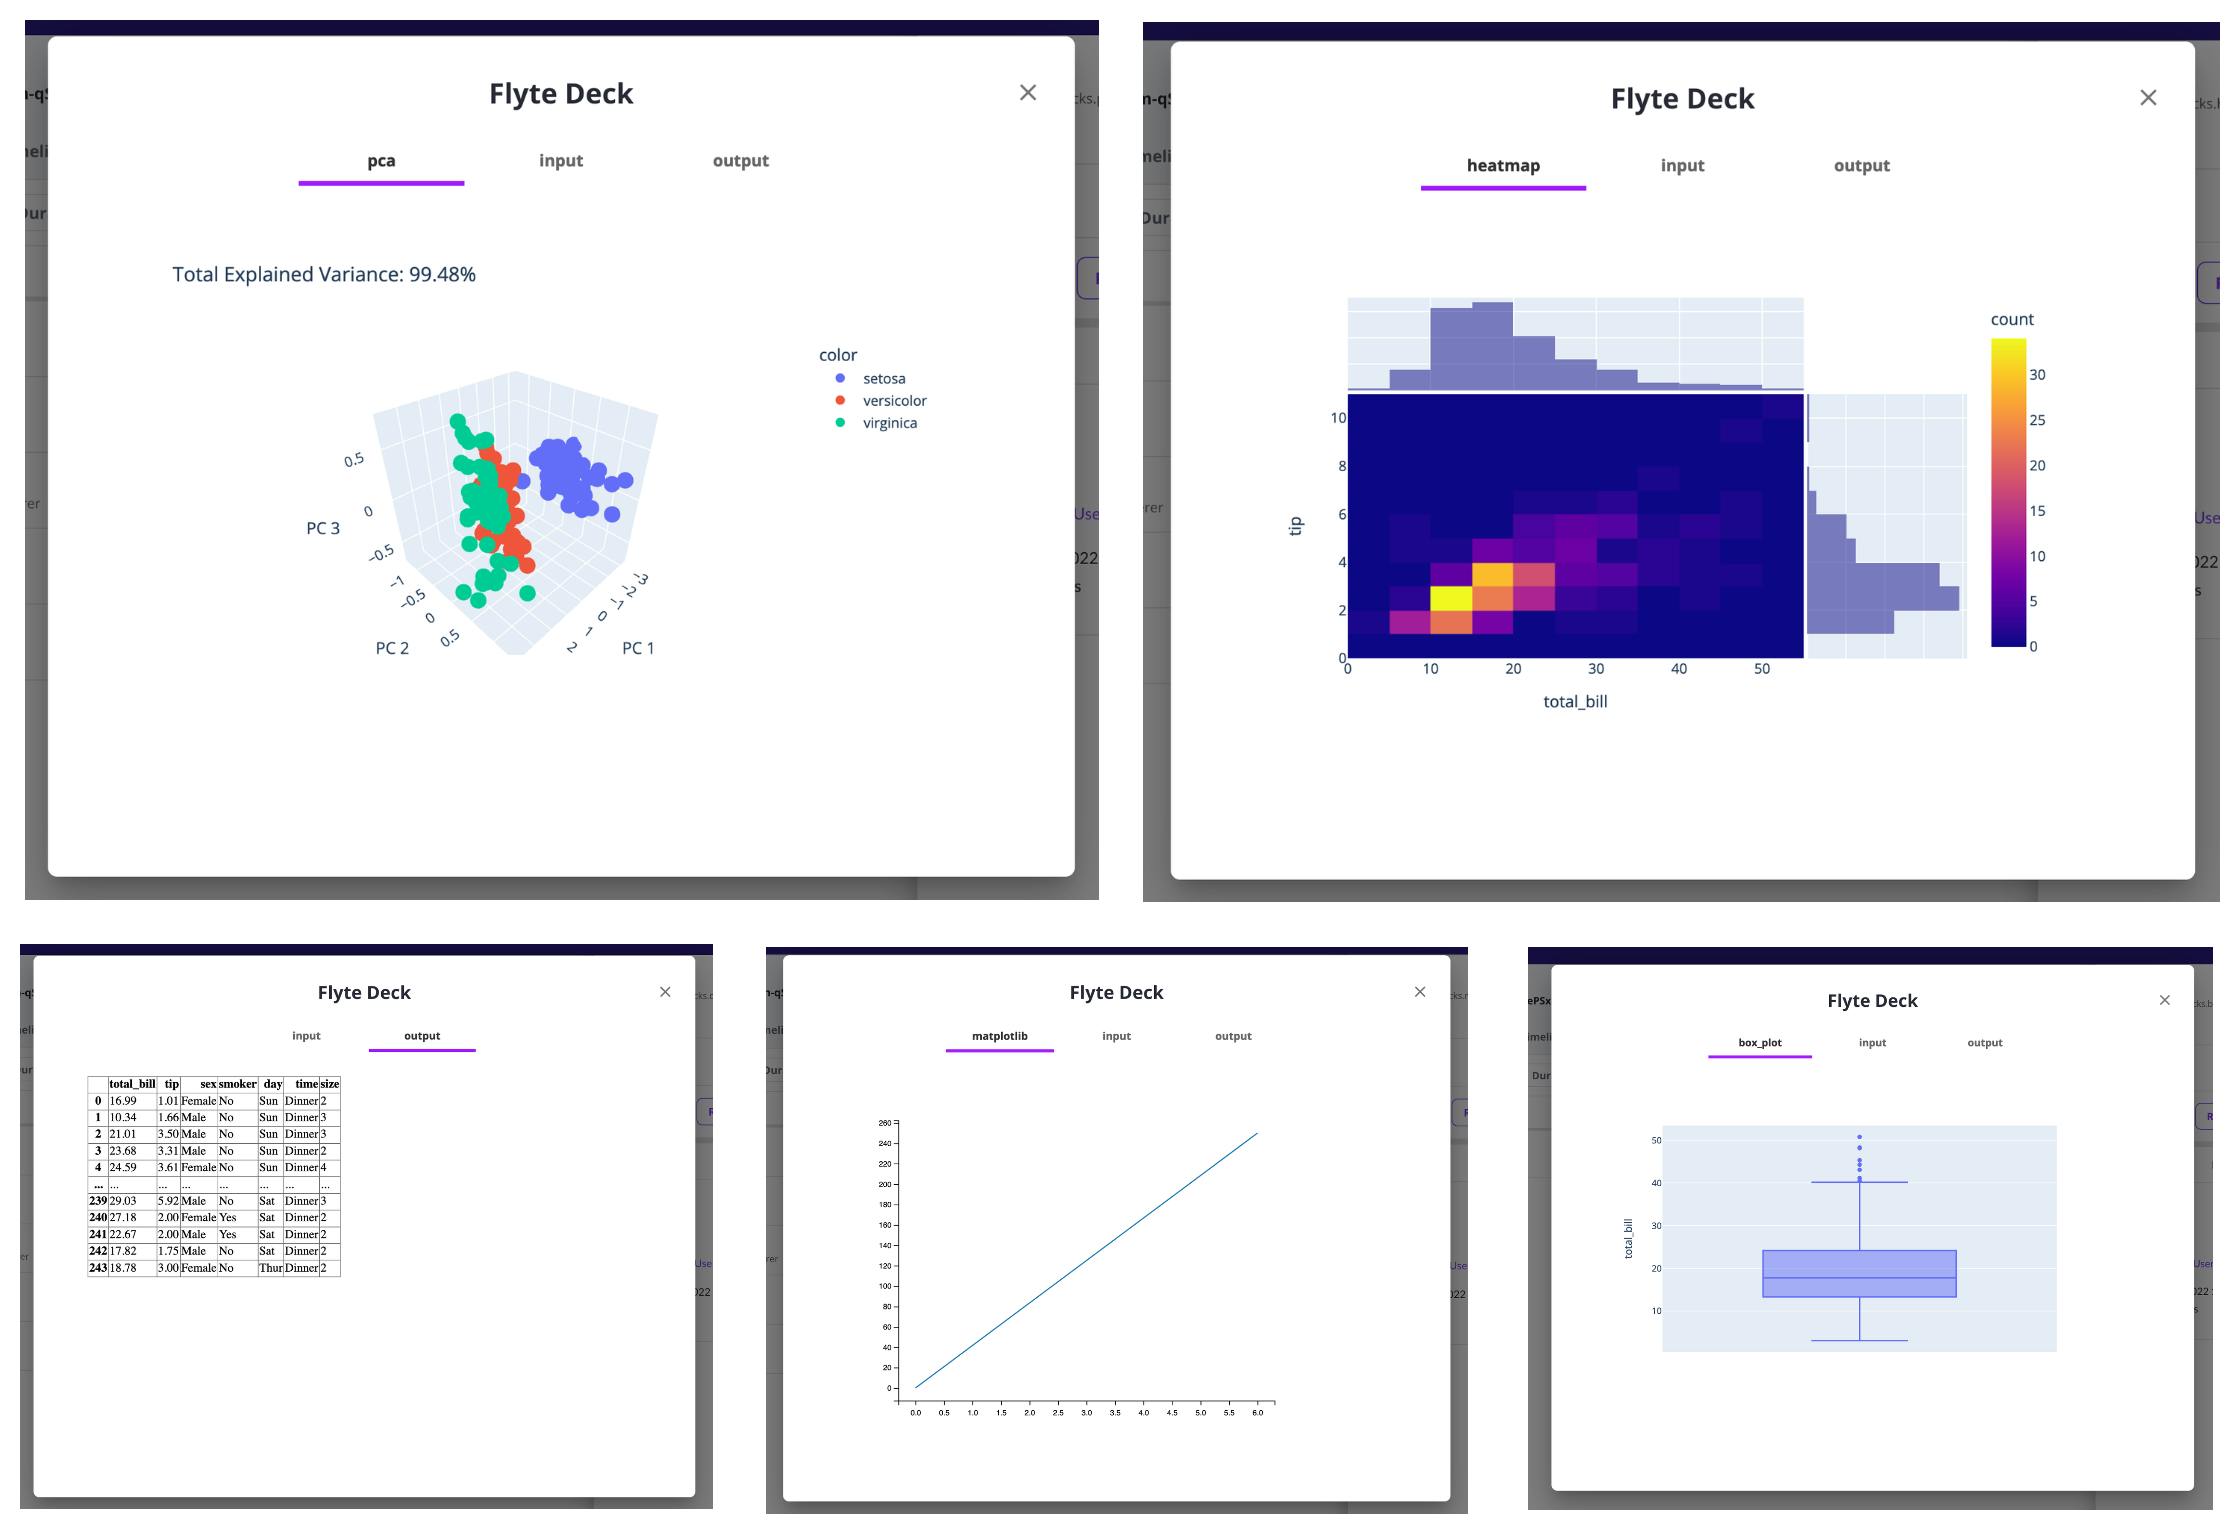 Flyte Decks
2.0 auto GPU-to-CPU conversion in PyTorch
Available from Flytekit 1.1.1
 Fire up your ML code (Stable Diffusion)
PyTorch is a powerful and dominant ML framework. One of its notable ( and 🙃) features is manual device conversion — a GPU tensor doesn’t work on a CPU. This conversion has been automated within Flyte with the newly added PyTorch types.
from typing import Tuple

import numpy as np
import torch
from flytekit import Resources, task
from flytekit.extras.pytorch import PyTorchCheckpoint


@task(requests=Resources(gpu="1"))
def train() -> Tuple[PyTorchCheckpoint, torch.Tensor, torch.Tensor, torch.Tensor]:
    ...
    device = torch.device(
        "cuda" if torch.cuda.is_available() else "cpu"
    )
    model = Model(X_train.shape[1])
    model.to(device)
    ...
    X_train, X_test = X_train.to(device), X_test.to(device)
    y_train, y_test = y_train.to(device), y_test.to(device)
    ...
    return PyTorchCheckpoint(module=model), X_train, X_test, y_test


@task
def predict(
    checkpoint: PyTorchCheckpoint,
    X_train: torch.Tensor,
    X_test: torch.Tensor,
    y_test: torch.Tensor,
):
    new_bn = Model(X_train.shape[1])
    new_bn.load_state_dict(checkpoint["module_state_dict"])

    accuracy_list = np.zeros((5,))

    with torch.no_grad():
        y_pred = new_bn(X_test)
        correct = (
            torch.argmax(y_pred, dim=1) == y_test
        ).type(torch.FloatTensor)
        accuracy_list = correct.mean()
The train task runs on a GPU, whereas the predict task runs on a CPU. Have you noticed the omission of to(torch.device("cpu")) in the predict task? 😅 The conversion happens automatically within the Flyte types.
Note: PyTorchCheckpoint is a special type of checkpoint to serialize and deserialize PyTorch models. It checkpoints torch.nn.Module’s state, hyperparameters and optimizer state as described in the PyTorch best practices recipe.
3.0 native support for ONNX models
Available from Flytekit 1.1.1
 ML frameworks converge at one point: ONNX (Stable Diffusion)
Open Neural Network Exchange (ONNX) is an open standard for representing ML models. To facilitate the conversion from ML models to ONNX, we’ve developed ScikitLearn, PyTorch and TensorFlow converters and added them to the existing set of Flyte integrations.
ScikitLearn
pip install flytekitplugins-onnxscikitlearn
TensorFlow
pip install flytekitplugins-onnxtensorflow
PyTorch
pip install flytekitplugins-onnxpytorch
from typing import List

import numpy as np
import onnxruntime as rt
import tensorflow as tf
from flytekit import Resources, task
from flytekit.types.file import ONNXFile
from flytekitplugins.onnxtensorflow import TensorFlow2ONNX, TensorFlow2ONNXConfig
from tensorflow.keras import layers, models
from typing_extensions import Annotated


@task(requests=Resources(mem="1000Mi", cpu="2"))
def train(
    train_images: np.ndarray, train_labels: np.ndarray
) -> Annotated[
    TensorFlow2ONNX,
    TensorFlow2ONNXConfig(
        input_signature=(
            tf.TensorSpec((None, 32, 32, 3),
            tf.double, name="input"),
        ),
        opset=13,
    ),
]:
    model = models.Sequential()
    model.add(layers.Conv2D(
        32,
        (3, 3),
        activation="relu",
        input_shape=(32, 32, 3)
    ))
    model.add(layers.MaxPooling2D((2, 2)))
    model.add(layers.Conv2D(64, (3, 3), activation="relu"))
    model.add(layers.Flatten())
    model.add(layers.Dense(64, activation="relu"))
    model.add(layers.Dense(10))

    model.compile(
        optimizer="adam",
        loss=tf.keras.losses.SparseCategoricalCrossentropy(
            from_logits=True
        ),
        metrics=["accuracy"],
    )

    model.fit(train_images, train_labels, epochs=2)

    return TensorFlow2ONNX(model=model)


@task(requests=Resources(mem="1000Mi", cpu="2"))
def onnx_predict(
    model: ONNXFile,
    test_images: np.ndarray,
) -> List[np.ndarray]:
    m = rt.InferenceSession(
        model.download(),
        providers=["CPUExecutionProvider"]
    )
    onnx_pred = m.run(
        [n.name for n in m.get_outputs()],
        {"input": test_images}
    )
    return onnx_pred
4.0 Spark Pipelines
Available from Flytekit 1.1.1
 Spark your workflows (Stable Diffusion)
Spark is one of the most used integrations in Flyte. To provide support for passing along a Spark pipeline between the Flyte tasks, a Spark ML pipeline type has been added.
import flytekit
import pyspark
from flytekit import Resources, task, workflow
from flytekitplugins.spark import PySparkPipelineModelTransformer, Spark
from pyspark.ml import Pipeline, PipelineModel
from pyspark.ml.feature import Imputer

SPARK_CONF = {
    "spark.driver.memory": "1000M",
    "spark.executor.memory": "1000M",
    "spark.executor.cores": "1",
    "spark.executor.instances": "2",
    "spark.driver.cores": "1",
}


@task(
    task_config=Spark(spark_conf=SPARK_CONF),
    limits=Resources(mem="2000Mi"),
)
def my_dataset() -> pyspark.sql.DataFrame:
    session = flytekit.current_context().spark_session
    df = session.createDataFrame(
        [
            ("Megan", 2.0),
            ("Wayne", float("nan")),
            ("Dennis", 8.0)],
            ["name", "age"]
    )
    return df


@task(
    task_config=Spark(spark_conf=SPARK_CONF),
    limits=Resources(mem="2000Mi"),
)
def my_pipeline(df: pyspark.sql.DataFrame) -> PipelineModel:
    imputer = Imputer(inputCols=["age"], outputCols=["imputed_age"])
    pipeline = Pipeline(stages=[imputer]).fit(df)
    return pipeline


@task(
    task_config=Spark(spark_conf=SPARK_CONF),
    limits=Resources(mem="2000Mi"),
)
def run_pipeline(df: pyspark.sql.DataFrame, pipeline: PipelineModel) -> int:
    imputed_df = pipeline.transform(df)

    return imputed_df.filter(
        imputed_df["imputed_age"].isNull()
    ).count()


@workflow
def my_wf() -> int:
    df = my_dataset()
    pipeline = my_pipeline(df=df)

    return run_pipeline(df=df, pipeline=pipeline)
The PipelineModel can now be serialized and deserialized as any other Flyte type.
5.0 whylogs Integration
Available from Flytekit 1.1.1
 A whole lot of data logs (Stable Diffusion)
whylogs is an open-source data and ML models logging library. It creates statistical summaries of datasets to track changes in them, create data constraints, and visualize key summary statistics. whylogs can be used from within Flyte using the newly added integration.
pip install flytekitplugins-whylogs
Running this example with modified constraints generates the following reports:
@task
def constraints_report(profile_view: DatasetProfileView) -> bool:
    builder = ConstraintsBuilder(dataset_profile_view=profile_view)
    builder.add_constraint(
        greater_than_number(column_name="age", number=11.0)
    )
    builder.add_constraint(
        smaller_than_number(column_name="bp", number=5.0)
    )
    builder.add_constraint(
        mean_between_range(column_name="s3", lower=-1.5, upper=1.5)
    )
    builder.add_constraint(
        null_percentage_below_number(column_name="sex", number=0.0)
    )

    constraints = builder.build()

    renderer = WhylogsConstraintsRenderer()
    flytekit.Deck(
        "constraints",
        renderer.to_html(constraints=constraints)
    )

    return constraints.validate()
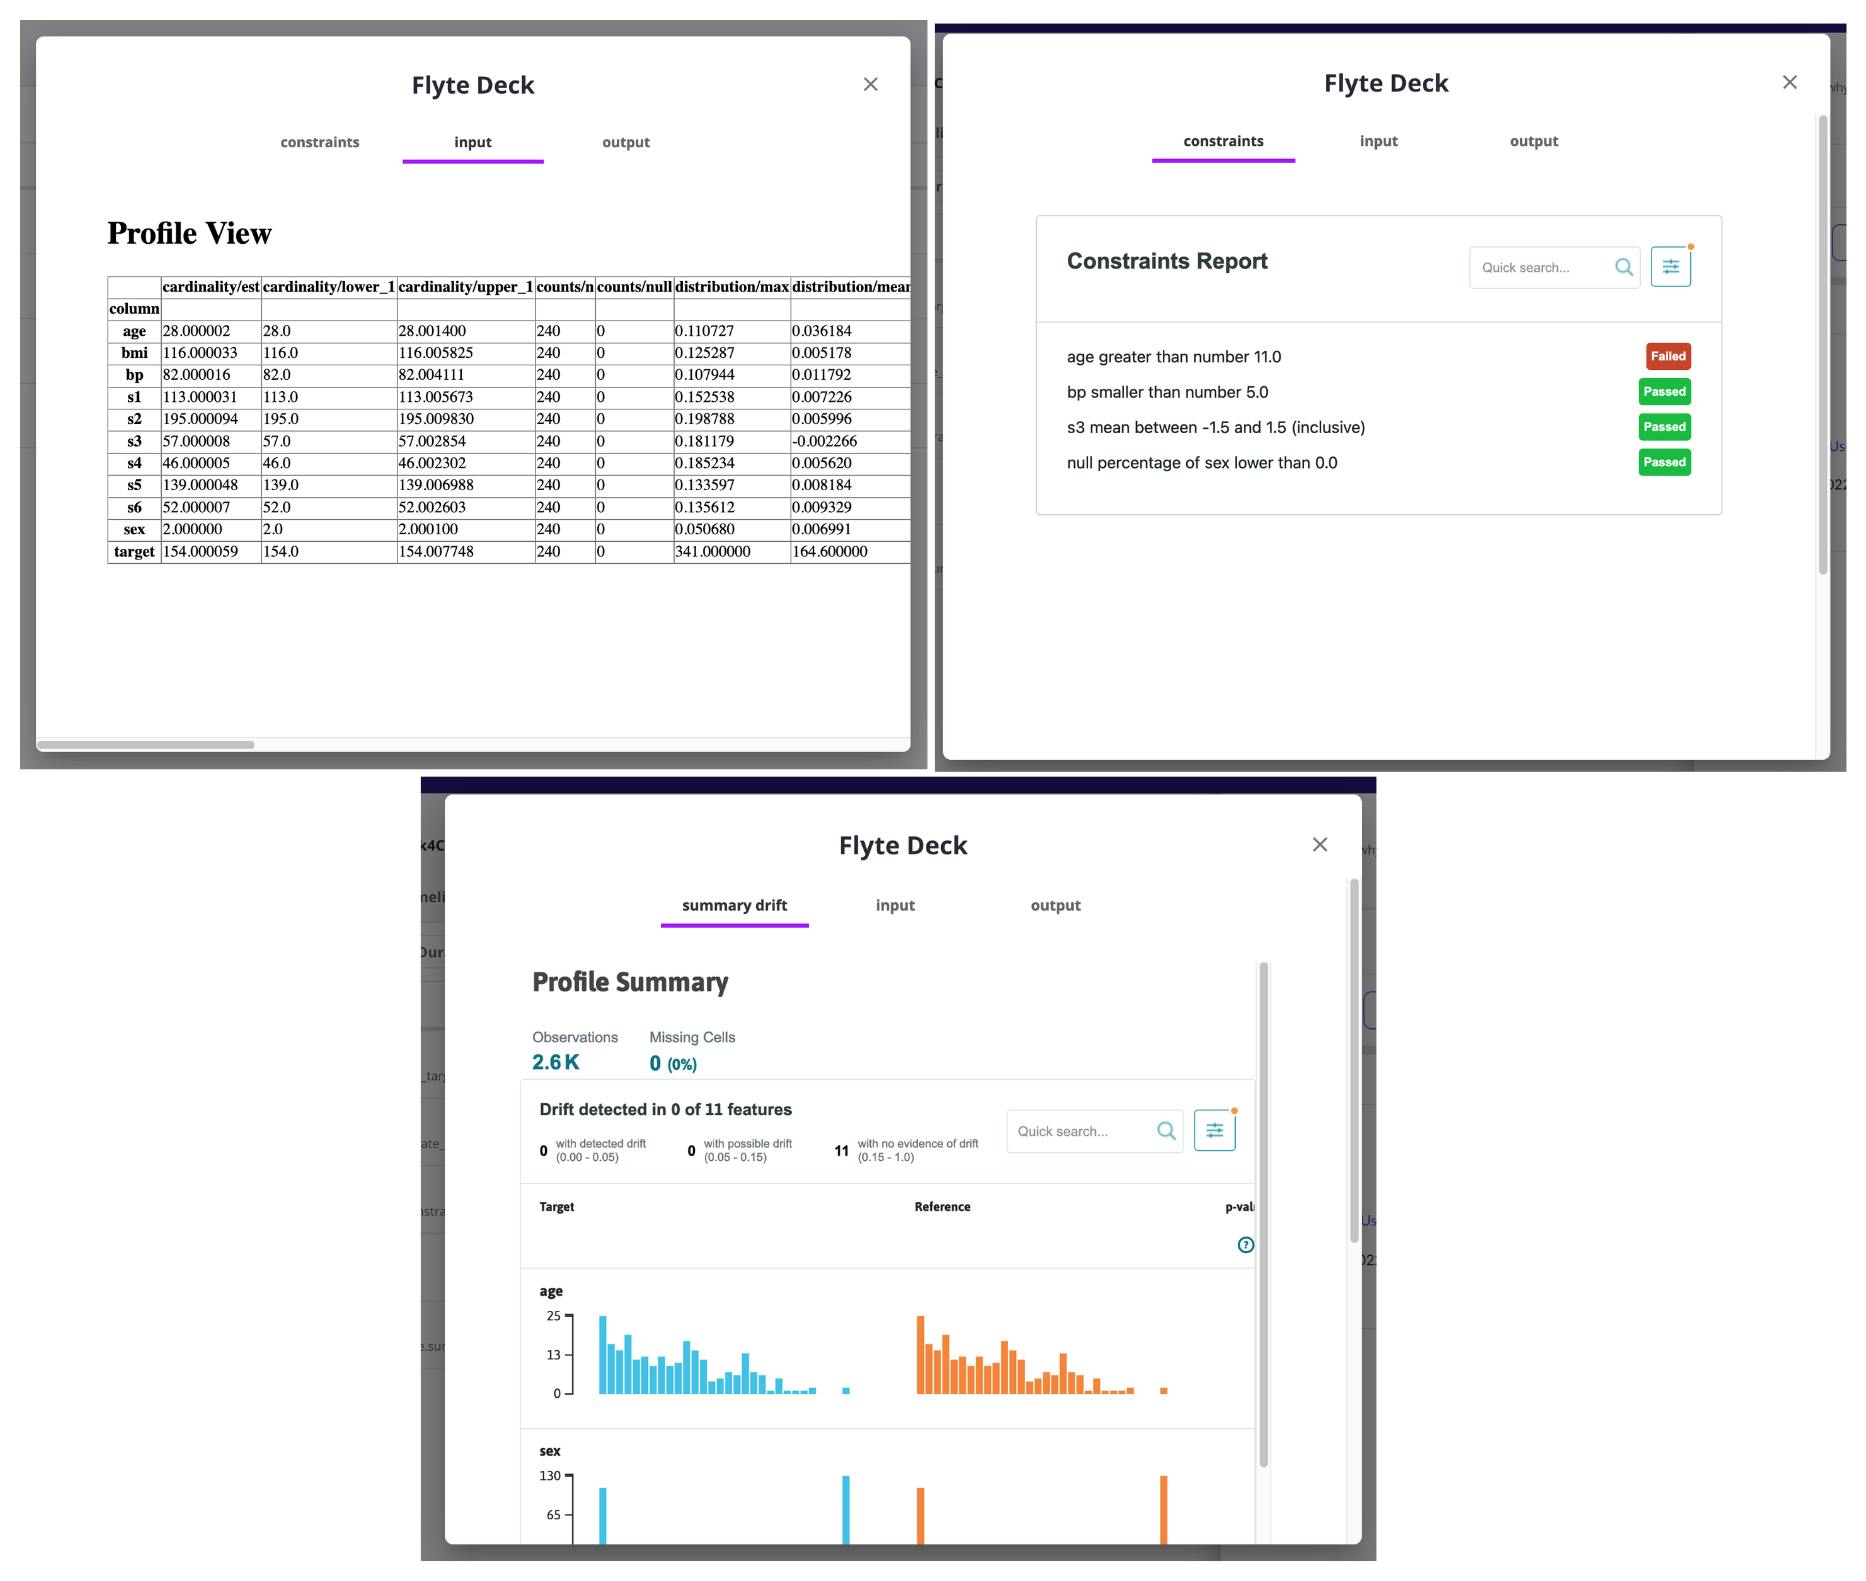 whylogs reports
Next steps
This article covered a handful of newly added ML features to Flyte that can simplify building and deploying ML models. Give these features a shot, and let us know what you think of them. You can also take a look at our roadmap to see what’s coming next. Join our Slack in case you have any questions!